Why Fruity Pebbles Cheesecake Tacos Are a Must-Try
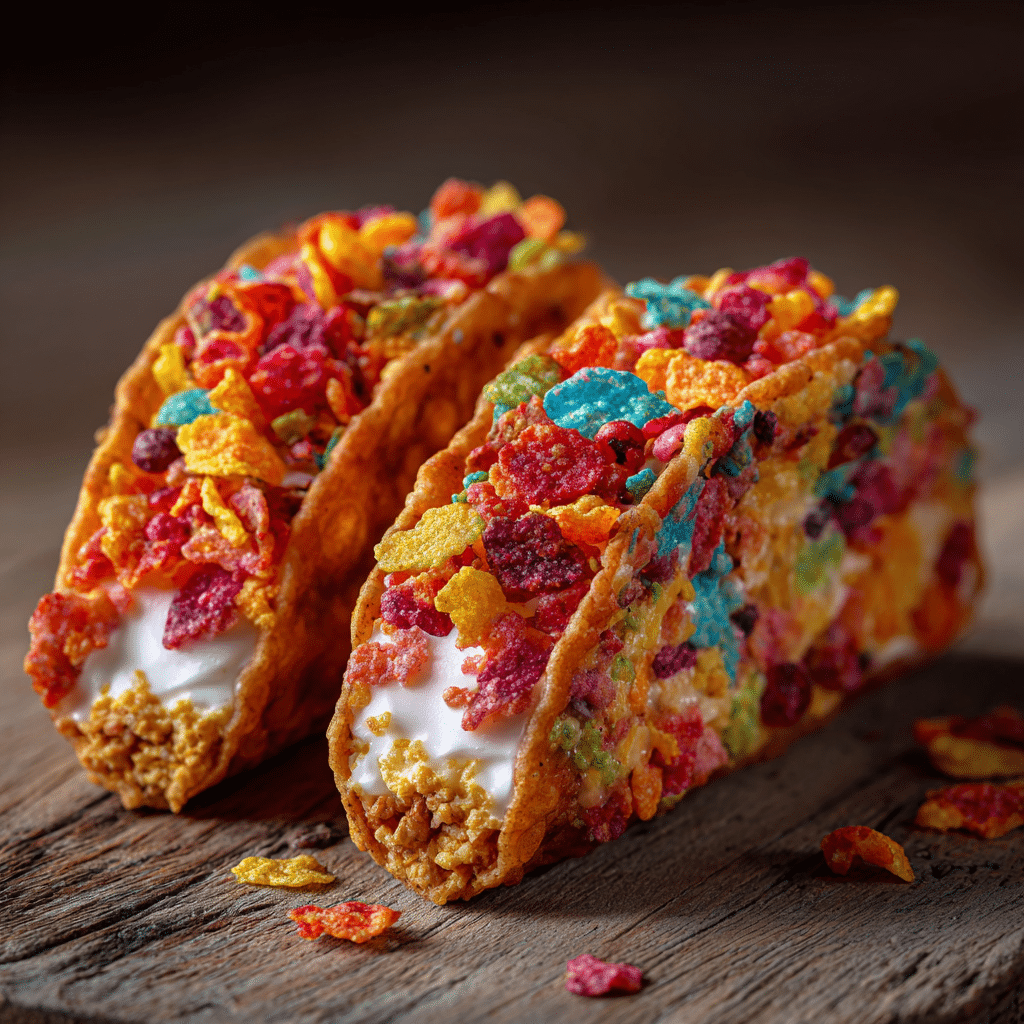
If you’re looking for a dessert that’s bursting with color, flavor, and fun, then Fruity Pebbles Cheesecake Tacos are exactly what you need! This vibrant treat combines the creamy indulgence of cheesecake with the playful crunch of Fruity Pebbles cereal, all wrapped up like a taco for a whimsical and satisfying sweet bite. Whether you’re entertaining friends, surprising the kids, or just in the mood for something delightfully different, Fruity Pebbles Cheesecake Tacos offer a unique twist that makes dessert time unforgettable.
Why You’ll Love This Recipe
- Playful Flavor Explosion: The Fruity Pebbles bring a bright, fruity pop that contrasts beautifully with the smooth cheesecake filling.
- Visual Appeal: These tacos are as colorful as they are tasty, making them perfect for parties and photo-worthy moments.
- Quick and Easy: No complicated baking required, just simple steps that anyone can master.
- Customizable: The recipe can be tweaked for different dietary preferences or tastes without losing its charm.
- Perfect Portion Control: Tacos make it easy to serve individual portions that are just right for satisfying sweet cravings.
Ingredients You’ll Need
Every ingredient in Fruity Pebbles Cheesecake Tacos plays an essential role, from the creamy texture of the cheesecake filling to the crunchy and colorful Fruity Pebbles crust. These simple staples come together to create a dessert that excites both your taste buds and your eyes.
- Fruity Pebbles Cereal: Adds a crisp, fruity crunch and vibrant colors that make these tacos stand out.
- Cream Cheese: Provides the rich, smooth base for the cheesecake filling.
- Powdered Sugar: Sweetens the cheesecake filling while keeping the texture silky.
- Vanilla Extract: Enhances the flavor of the cheesecake with a warm, inviting aroma.
- Whipped Topping or Heavy Cream: Lightens up the cheesecake mixture for a fluffy finish.
- Crispy Waffle Cones or Sugar Cones: Serve as the crunchy “shells” to hold the cheesecake and Fruity Pebbles together.
Variations for Fruity Pebbles Cheesecake Tacos
Feel free to get creative with your Fruity Pebbles Cheesecake Tacos! This recipe is super easy to adapt whether you want to accommodate dietary restrictions, introduce new flavors, or simply switch up the look for special occasions.
- Dairy-Free Version: Substitute cream cheese and whipped topping with coconut-based or almond-based alternatives for a vegan option.
- Chocolate Lover’s Twist: Mix cocoa powder into the cheesecake filling and use chocolate waffle cones for an extra decadent flavor.
- Berry Burst: Add fresh or freeze-dried berries into the filling or as a garnish for a fruity boost.
- Nutty Crunch: Sprinkle chopped nuts like almonds or pecans on top for added texture and richness.
- Mini Size: Use smaller waffle cones to make bite-sized cheesecake tacos perfect for parties or kids’ snacks.

How to Make Fruity Pebbles Cheesecake Tacos
Step 1: Prepare the Cheesecake Filling
In a mixing bowl, beat softened cream cheese until smooth. Add powdered sugar and vanilla extract, then gently fold in whipped topping or lightly whipped heavy cream to keep the mixture light and fluffy.
Step 2: Coat the Waffle Cones
Take the waffle cones and dip the edges into a small bowl of crushed Fruity Pebbles cereal, pressing gently to adhere. This creates a colorful, crunchy shell edge for your cheesecake tacos.
Step 3: Fill the Tacos
Spoon or pipe the cheesecake filling into each waffle cone, filling them generously but leaving some room at the top for extra toppings.
Step 4: Garnish and Chill
Sprinkle additional Fruity Pebbles on top of each filled cone for a vibrant finish. Refrigerate the tacos for at least an hour to firm up the filling before serving.
Pro Tips for Making Fruity Pebbles Cheesecake Tacos
- Soft Cream Cheese: Make sure the cream cheese is softened to room temperature to avoid lumps in your filling.
- Light Folding: Fold whipped topping gently into the cheesecake mixture to keep it airy and prevent deflation.
- Secure Cereal Coating: Use a bit of cream cheese or frosting as “glue” to help the Fruity Pebbles stick better to the cone edges.
- Chill Time: Refrigerate the tacos well so the cheesecake filling sets up perfectly for easy handling and eating.
- Serve Fresh: Fruity Pebbles can lose their crunch if left out too long, so serve these soon after making.
How to Serve Fruity Pebbles Cheesecake Tacos
Garnishes
Fresh fruit slices like strawberries, kiwi, or blueberries add a refreshing contrast, while a drizzle of fruit syrup or chocolate sauce can amp up the sweetness and visual appeal.
Side Dishes
Pair these colorful cheesecake tacos with light sides such as a simple green salad or a scoop of sorbet to balance out the richness and keep the meal fresh.
Creative Ways to Present
Serve the tacos in a taco holder or stand them upright in a decorative cup filled with Fruity Pebbles as a festive and fun display for parties or casual get-togethers.
Make Ahead and Storage
Storing Leftovers
Keep any leftover Fruity Pebbles Cheesecake Tacos refrigerated in an airtight container to maintain freshness and prevent sogginess of the cereal coating.
Freezing
It’s best not to freeze these tacos as the texture of the cheesecake filling and cereal coating will be compromised upon thawing.
Reheating
Serve the cheesecake tacos chilled or at room temperature; reheating is not recommended because it will affect the texture and crunch.
FAQs
Can I use other cereals instead of Fruity Pebbles?
Absolutely! You can experiment with colorful cereals like Rice Krispies or Lucky Charms to get a similar fun and crunchy effect, but Fruity Pebbles have a uniquely vibrant look and fruity flavor.
Is this recipe gluten-free?
Traditional waffle cones contain gluten, so you would need to seek out gluten-free cones or even use waffle bowls made from gluten-free ingredients to make this dessert gluten-free.
How long do Fruity Pebbles Cheesecake Tacos last?
They are best enjoyed on the day of making, but if refrigerated properly, they can last up to 2 days with the best texture and taste.
Can I make the cheesecake filling ahead of time?
Yes, you can prepare the cheesecake filling a day in advance and keep it refrigerated; just give it a quick stir before filling the cones.
Are these suitable for kids’ parties?
Definitely! Fruity Pebbles Cheesecake Tacos are visually appealing and portioned perfectly for kids, making them a fun and popular party treat.
Final Thoughts
If you want to add a pop of color and a burst of flavor to your dessert lineup, Fruity Pebbles Cheesecake Tacos are an absolute must-try. They’re easy to make, endlessly customizable, and guaranteed to bring smiles around the table. So go ahead, whip up a batch, share with friends, and enjoy every deliciously crunchy, creamy bite!
Related Posts
- 5 Easy Cheesecake Fruit Salad Roll Ups Recipes
- Why Peach Cobbler Cheesecake Wins Every Time
- Irresistible Strawberry Mango Margarita Cupcakes Recipe
Fruity Pebbles Cheesecake Tacos

Fruity Pebbles Cheesecake Tacos are a colorful, fun dessert that combines creamy cheesecake filling with the playful crunch of Fruity Pebbles cereal, all served in a crispy waffle cone taco shell. Perfect for parties, kids’ snacks, or a unique sweet treat, these no-bake tacos are easy to make, customizable, and visually appealing.
- Prep Time: 15 minutes
- Cook Time: 0 minutes
- Total Time: 1 hour 15 minutes (including chilling)
- Yield: 6 cheesecake tacos 1x
- Category: Dessert
- Method: No-bake
- Cuisine: American
- Diet: Gluten Free (use gluten-free cones)
Ingredients
Filling Ingredients
- 8 oz cream cheese, softened
- 1 cup powdered sugar
- 1 teaspoon vanilla extract
- 1 cup whipped topping or lightly whipped heavy cream
Coating and Shell Ingredients
- Fruity Pebbles cereal, crushed (for coating and garnish)
- 6 crispy waffle cones or sugar cones
Instructions
- Prepare the Cheesecake Filling: In a mixing bowl, beat the softened cream cheese until smooth. Add powdered sugar and vanilla extract, mixing well. Gently fold in whipped topping or lightly whipped heavy cream to keep the mixture light and fluffy.
- Coat the Waffle Cones: Dip the edges of the waffle cones into a small bowl of crushed Fruity Pebbles cereal, pressing gently so the cereal adheres and creates a colorful, crunchy shell edge for your cheesecake tacos.
- Fill the Tacos: Spoon or pipe the cheesecake filling into each waffle cone, filling them generously but leaving some room at the top for additional toppings.
- Garnish and Chill: Sprinkle extra Fruity Pebbles on top of each filled cone for a vibrant finish. Refrigerate the tacos for at least one hour to allow the filling to firm up before serving.
Notes
- Make sure the cream cheese is softened to room temperature to avoid lumps in your filling.
- Fold whipped topping gently into the cheesecake mixture to keep it airy and prevent deflation.
- Use a bit of cream cheese or frosting as ‘glue’ to help the Fruity Pebbles stick better to the cone edges.
- Refrigerate the tacos well so the cheesecake filling sets perfectly for easy handling and eating.
- Serve the tacos soon after making to maintain the crunch of the Fruity Pebbles.
Nutrition
- Serving Size: 1 taco
- Calories: 250
- Sugar: 20g
- Sodium: 150mg
- Fat: 15g
- Saturated Fat: 8g
- Unsaturated Fat: 5g
- Trans Fat: 0g
- Carbohydrates: 20g
- Fiber: 1g
- Protein: 3g
- Cholesterol: 45mg
Keywords: Fruity Pebbles, cheesecake tacos, no-bake dessert, colorful dessert, kids party dessert, easy cheesecake, fruity dessert