How to Make Fruity Pebbles Sushi at Home

If you’ve ever dreamed of combining nostalgic breakfast cereal with the playful fun of sushi, then you’re in for an absolute treat with Fruity Pebbles Sushi. This vibrant, colorful dessert reinvents your favorite fruity cereal into bite-sized rolls that are as delightful to the eye as they are to the palate. Bursting with flavor and cheerful colors, Fruity Pebbles Sushi is a simple, creative, and irresistibly fun way to satisfy your sweet tooth at home.
Why You’ll Love This Recipe
- Playful nostalgia: Fruity Pebbles Sushi brings back childhood memories with a fresh, exciting twist.
- Easy to make: This recipe uses simple ingredients anyone can find and requires minimal cooking skills.
- Eye-catching colors: The vivid hues make it a party-ready dessert that instantly lifts the mood.
- Customizable flavors: You can tailor the fillings and toppings to suit your favorite tastes.
- Great for all ages: Kids and adults alike will enjoy both making and eating these sweet rolls.
Ingredients You’ll Need
This recipe calls for simple but essential ingredients, each contributing unique taste, texture, and that signature bright look. Gather these staples to transform Fruity Pebbles into delightful sushi rolls.
- Fruity Pebbles Cereal: The star of the dish providing vibrant colors and fruity flavor.
- Marshmallows: They act like the “glue,” binding the cereal together for easy rolling and slicing.
- Butter: Helps melt the marshmallows smoothly and gives a rich, creamy texture.
- Rice Krispies Cereal: Optional but recommended for a slightly firmer and chewier base.
- Vanilla frosting or cream cheese: Used as a creamy filling to complement the crunch.
- Fresh fruit slices: For a fresh topping that adds contrasting flavor and freshness.
Variations for Fruity Pebbles Sushi
One of the best parts about Fruity Pebbles Sushi is how easily you can customize it. Whether you’re after different flavors, textures, or dietary accommodations, these variations will inspire you to make it your own.
- Chocolate twist: Substitute marshmallows with chocolate fudge for a rich, decadent roll.
- Fruit-filled rolls: Add mango, strawberries, or blueberries inside the sushi for an extra fruity punch.
- Vegan version: Use vegan marshmallows and dairy-free butter substitutes for a plant-based dessert.
- Nutty crunch: Sprinkle crushed nuts or seeds over the outer layer for an added texture contrast.
- Savory fusion: Mix in a pinch of sea salt or coconut flakes for a balance of sweet and salty flavors.

How to Make Fruity Pebbles Sushi
Step 1: Melt the butter and marshmallows
In a large saucepan over low heat, melt the butter slowly. Add marshmallows and stir continuously until completely melted and smooth, making the binding base for your cereal.
Step 2: Mix in the cereals
Remove the saucepan from heat and gently fold in Fruity Pebbles and Rice Krispies (if using). Mix quickly to ensure the cereal is evenly coated and sticky enough to hold its shape.
Step 3: Shape the base layer
Transfer the mixture to a parchment-lined baking sheet or a rolling mat and press it down firmly into a flat rectangle about 1/2-inch thick, using a buttered spatula or wax paper to avoid sticking.
Step 4: Add the filling
Spread a thin, even layer of vanilla frosting or cream cheese over the rectangle. Add thin slices of fresh fruit if desired for an extra burst of flavor inside the roll.
Step 5: Roll it up
Using the parchment as a guide, carefully roll the rectangle into a tight log, pressing gently to keep it compact. Chill in the refrigerator for 20 minutes to set the shape.
Step 6: Slice and serve
Remove the roll from the fridge and slice into bite-sized “sushi” pieces using a sharp, clean knife. Arrange the pieces on a plate and optionally garnish with more Fruity Pebbles or fresh fruit.
Pro Tips for Making Fruity Pebbles Sushi
- Use wax paper or parchment: This will prevent the mixture from sticking to your hands or surface during shaping.
- Work quickly: The cereal mix hardens as it cools, so try to roll and shape it promptly before it gets too stiff.
- Use a sharp knife: Clean cuts make for beautiful sushi pieces; wipe the knife clean between slices for best results.
- Add variety with fillings: Experiment with different frostings, fruit slices, or even small candy inside for exciting flavor contrasts.
- Chill before slicing: Refrigeration firms up the roll, making slicing much easier without crumbling.
How to Serve Fruity Pebbles Sushi
Garnishes
Top each Fruity Pebbles Sushi piece with mini marshmallows, edible sprinkles, or a light drizzle of white chocolate to make them extra festive and appealing.
Side Dishes
Serve with a side of whipped cream, fresh berries, or a small bowl of vanilla yogurt dip to complement the sweet and crunchy texture of the sushi rolls.
Creative Ways to Present
Use sushi platters, bamboo mats, or even colorful cupcake liners to arrange your Fruity Pebbles Sushi in fun, playful presentations perfect for parties or special occasions.
Make Ahead and Storage
Storing Leftovers
Store your Fruity Pebbles Sushi in an airtight container in the refrigerator for up to 2 days. This keeps the rolls fresh but slightly softens the cereal texture.
Freezing
You can freeze the sushi rolls wrapped tightly in plastic wrap and stored in a freezer bag for up to one month. Thaw in the refrigerator before serving.
Reheating
Since this is a no-bake dessert meant to be enjoyed cold or at room temperature, reheating is not recommended as it can melt the marshmallow binding and alter texture.
FAQs
Can I use other cereals besides Fruity Pebbles?
Absolutely! You can substitute or mix in other colorful cereals like Cocoa Pebbles, Rice Krispies, or even Cheerios for different flavors and textures.
Is this recipe gluten-free?
Fruity Pebbles themselves are gluten-free, but if you add Rice Krispies, make sure to use the gluten-free variety to keep the dish safe for gluten-sensitive individuals.
Can I make Fruity Pebbles Sushi without marshmallows?
Marshmallows act as the binding agent, so they are important for the texture. For alternatives, melted peanut butter or frosting can sometimes work, but the texture will vary.
How can I make this more kid-friendly?
This recipe is already kid-friendly, but you can involve children by letting them sprinkle toppings or roll the sushi themselves for a fun activity.
What is the best way to cut the sushi rolls?
Use a sharp knife and cut in a single downward motion. Wiping the blade clean after each slice will give you neat and even sushi pieces.
Final Thoughts
Fruity Pebbles Sushi is a cheerful, simple dessert that’s perfect for any time you want to impress or enjoy a colorful treat. It’s so much fun to make and eat, with endless room for creativity, making it a kitchen favorite for both kids and adults. Give it a try, and watch your kitchen come alive with fruity, sweet smiles!
Related Posts
- Why Byron Bay Chocolate Chip Cookies Are Irresistible
- Creamy White Chocolate Peanut Butter Fudge Recipe
- How to Make Irresistible Blueberry Pie Bombs
Fruity Pebbles Sushi
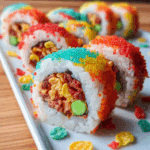
Fruity Pebbles Sushi is a vibrant, colorful dessert that reimagines nostalgic breakfast cereal into fun, bite-sized sushi rolls. Combining Fruity Pebbles, melted marshmallows, and optional fillings like vanilla frosting and fresh fruit, this easy no-bake treat is perfect for all ages, customizable, and visually delightful for parties or everyday snacking.
- Prep Time: 10 minutes
- Cook Time: 10 minutes
- Total Time: 30 minutes
- Yield: 12 sushi pieces 1x
- Category: Dessert
- Method: No-bake
- Cuisine: American
- Diet: Gluten Free
Ingredients
Main Ingredients
- 2 cups Fruity Pebbles Cereal
- 3 cups marshmallows
- 3 tablespoons butter
- 1 cup Rice Krispies Cereal (optional)
- 1/2 cup vanilla frosting or cream cheese
- Fresh fruit slices (such as mango, strawberries, or blueberries) as desired
Instructions
- Melt the butter and marshmallows: In a large saucepan over low heat, melt the butter slowly. Add marshmallows and stir continuously until completely melted and smooth, forming the binding base for your cereal.
- Mix in the cereals: Remove the saucepan from heat and gently fold in Fruity Pebbles and Rice Krispies (if using). Mix quickly to ensure the cereal is evenly coated and sticky enough to hold its shape.
- Shape the base layer: Transfer the mixture to a parchment-lined baking sheet or rolling mat. Press it down firmly into a flat rectangle about 1/2-inch thick, using a buttered spatula or wax paper to prevent sticking.
- Add the filling: Spread a thin, even layer of vanilla frosting or cream cheese over the rectangle. Add thin slices of fresh fruit if desired for an extra burst of flavor inside the roll.
- Roll it up: Using the parchment as a guide, carefully roll the rectangle into a tight log, pressing gently to keep it compact. Chill in the refrigerator for 20 minutes to set the shape.
- Slice and serve: Remove the roll from the fridge and slice into bite-sized “sushi” pieces using a sharp, clean knife. Arrange the pieces on a plate and optionally garnish with more Fruity Pebbles or fresh fruit.
Notes
- Use wax paper or parchment to prevent sticking during shaping.
- Work quickly because the cereal mix hardens as it cools.
- Use a sharp knife and wipe clean between slices for neat cuts.
- Experiment with different frostings, fruit slices, or candies inside for varied flavors.
- Chill the roll before slicing to firm it up and avoid crumbling.
Nutrition
- Serving Size: 1 piece
- Calories: 150
- Sugar: 20g
- Sodium: 80mg
- Fat: 4g
- Saturated Fat: 2.5g
- Unsaturated Fat: 1g
- Trans Fat: 0g
- Carbohydrates: 29g
- Fiber: 1g
- Protein: 1g
- Cholesterol: 10mg
Keywords: Fruity Pebbles sushi, dessert sushi, no-bake dessert, colorful dessert, kid-friendly dessert, Fruity Pebbles recipe, sweet sushi rolls