How to Make Witch Hat Halloween Cookies Easily

Get ready to delight your friends and family with a festive treat that’s as fun to make as it is to eat! Witch Hat Halloween Cookies combine the perfect balance of sweet, crunchy, and colorful elements to make your Halloween celebrations extra special. These charming cookies are quick to whip up using simple pantry ingredients, and their spooky design will impress both kids and adults alike. Whether you’re hosting a party or looking for a creative baking project, this recipe is guaranteed to bring smiles and satisfy those seasonal sweet cravings.
Why You’ll Love This Recipe
- Easy to Make: With straightforward steps and common ingredients, even beginner bakers can create these festive treats.
- Visually Stunning: The iconic witch hat shape is instantly recognizable and perfect for Halloween-themed gatherings.
- Delicious Flavor: Buttery cookies paired with rich chocolate and colorful candies deliver a satisfyingly sweet taste.
- Customizable: You can easily tweak the decorations to suit dietary needs or your personal aesthetic preferences.
- Great for Parties: These cookies make wonderful gifts, party favors, or centerpieces for any Halloween event.
Ingredients You’ll Need
To make your Witch Hat Halloween Cookies stand out, you only need a handful of simple, high-quality ingredients that work harmoniously to deliver delicious results. Each one plays an important role from the cookie base to the charming decorations.
- Cookie Base: All-purpose flour provides structure and the perfect tender crumb.
- Butter: Unsalted butter adds richness and a lovely buttery flavor.
- Sugar: Granulated sugar brings just the right amount of sweetness and helps with crispness.
- Vanilla Extract: A splash of vanilla enhances the overall flavor profile.
- Chocolate Kisses: Used as the tip of the witch hat, these chocolates melt slightly to help stick decorations together.
- Mini Chocolate Sandwich Cookies: Oreos or similar cookies form the base of the hat for both taste and shape.
- Orange or Colored Candy Melts: For the band around the hat, adding a bright pop of Halloween-themed color.
Variations for Witch Hat Halloween Cookies
Feel free to get creative with this recipe! Customizing your Witch Hat Halloween Cookies is a breeze and lets you cater to different tastes, allergies, or simply inject your personality into these already charming treats.
- Gluten-Free Option: Use gluten-free flour blend instead of regular flour to keep it friendly for gluten sensitivities.
- Vegan Version: Substitute butter with coconut oil and use dairy-free chocolate kisses and candies.
- Flavor Twists: Add cinnamon or pumpkin spice to the dough for an autumn-inspired flavor boost.
- Color Variations: Swap out candy melts for different colors like green, purple, or black to match your Halloween theme.
- Nutty Add-ins: Sprinkle finely chopped nuts into the dough for added texture and flavor complexity.

How to Make Witch Hat Halloween Cookies
Step 1: Prepare the Dough
Begin by creaming together softened butter and sugar until the mixture is light and fluffy. Add vanilla extract, then gradually mix in the flour until a soft dough forms. Chill the dough for about 30 minutes to make it easier to handle and roll out.
Step 2: Cut Out the Cookie Bases
Roll out the chilled dough on a lightly floured surface to about 1/4 inch thickness. Using a round cookie cutter approximately 2 inches in diameter, cut out cookie circles that will represent the base of the witch hat. Place them evenly spaced on a baking sheet lined with parchment paper.
Step 3: Bake the Cookies
Bake the cookies in a preheated oven at 350°F (175°C) for about 10-12 minutes until they are just beginning to turn golden at the edges. Let the cookies cool completely to firm up before decorating.
Step 4: Assemble the Witch Hats
Once cookies are cool, unwrap the chocolate kisses and gently press one onto the center of each cookie base. Use a dab of melted candy melts or frosting to secure the candy melts as the hatband around the base of the chocolate kiss. Allow everything to set before handling.
Step 5: Add Final Decorations
Get creative with additional sprinkles or edible glitter if you like! Once the candy melts have hardened, your Witch Hat Halloween Cookies are ready to serve or pack up for gifting.
Pro Tips for Making Witch Hat Halloween Cookies
- Chill the Dough Well: It makes cutting out shapes easier and prevents spreading during baking.
- Use Parchment Paper: This helps prevent cookies from sticking and makes clean-up a breeze.
- Work Quickly with Candy Melts: They harden fast, so have your decorations ready before melting.
- Cool Cookies Completely: Decorating hot or warm cookies can cause your designs to melt or shift.
- Store Properly: Keep cookies in an airtight container to maintain their crisp texture.
How to Serve Witch Hat Halloween Cookies
Garnishes
Adding colorful edible glitter or sugar sprinkles around the hatband adds a magical sparkle that enhances the Halloween vibe. Fresh mint leaves can also lend a nice pop of green if you’re going for a witch forest theme.
Side Dishes
Serve these cookies alongside hot apple cider, pumpkin spice lattes, or your favorite warm beverage to keep the autumn spirit alive. They also pair wonderfully with a simple bowl of fresh fruit to balance the sweetness.
Creative Ways to Present
Arrange the Witch Hat Halloween Cookies on a tiered cake stand or scatter them across a black serving platter lined with orange tissue paper for eye-catching presentation. Use small cauldrons or witch-themed bowls for a playful touch, perfect for Halloween parties or classroom treats.
Make Ahead and Storage
Storing Leftovers
Place leftover Witch Hat Halloween Cookies in an airtight container at room temperature, where they will stay fresh for up to five days. Keep them separated with parchment paper for best texture retention.
Freezing
You can freeze unassembled cookies after baking in an airtight container or freezer bag for up to two months. For best results, assemble right before serving to keep the candy melts and decorations intact.
Reheating
If you prefer slightly warm cookies, reheat gently in a microwave for 10-15 seconds or in a low-temperature oven for a few minutes. Avoid overheating to maintain the cookie’s crispness and keep toppings from melting.
FAQs
Can I use a different type of chocolate instead of kisses?
Absolutely! Small pieces of chocolate or even mini truffles can work well as the hat tip, just make sure they are easy to melt and set with the candy melts or frosting to hold decorations together.
Are these cookies suitable for children with nut allergies?
Yes, this recipe is naturally nut-free as long as you choose ingredients like chocolate kisses and candy melts that are manufactured in a nut-free facility.
How long do Witch Hat Halloween Cookies keep their freshness?
Stored properly in an airtight container, these cookies stay fresh for about five days at room temperature, making them perfect for making ahead of time.
Can I decorate these cookies with royal icing instead?
Definitely! Royal icing works beautifully and can provide more intricate detail if you want to create patterns or faces on the hats.
What can I do if the candy melts are too hard to work with?
Try warming the candy melts in short bursts in the microwave and stirring frequently to achieve a smooth, spreadable consistency. Adding a small amount of vegetable shortening can also help.
Final Thoughts
Witch Hat Halloween Cookies are a delightful way to add whimsy and sweetness to your Halloween celebrations. Easy to make, visually captivating, and utterly delicious, they’re sure to become a seasonal favorite in your baking repertoire. Grab your ingredients, roll up your sleeves, and have fun creating these magical treats that everyone will love!
Related Posts
- 5 Easy Cheesecake Fruit Salad Roll Ups Recipes
- Why Peach Cobbler Cheesecake Wins Every Time
- Irresistible Strawberry Mango Margarita Cupcakes Recipe
Witch Hat Halloween Cookies
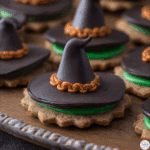
Witch Hat Halloween Cookies are a fun and festive treat perfect for Halloween celebrations. These buttery, crunchy cookies feature a charming witch hat design using simple pantry ingredients like all-purpose flour, butter, sugar, chocolate kisses, mini chocolate sandwich cookies, and colorful candy melts. Easy to make and visually stunning, these cookies delight both kids and adults with their sweet flavor and playful appearance. They are customizable for dietary needs and make great party favors or gifts.
- Prep Time: 45 minutes
- Cook Time: 12 minutes
- Total Time: 57 minutes
- Yield: 24 cookies 1x
- Category: Appetizers
- Method: Baking
- Cuisine: American
- Diet: Gluten Free Option Available
Ingredients
Cookie Base
- 2 ½ cups all-purpose flour
- 1 cup unsalted butter, softened
- ¾ cup granulated sugar
- 1 teaspoon vanilla extract
Decorations
- Chocolate kisses (one per cookie)
- Mini chocolate sandwich cookies (Oreos or similar)
- Orange or colored candy melts
Optional Add-Ins & Variations
- Gluten-free flour blend (for gluten-free option)
- Coconut oil (to replace butter for vegan version)
- Dairy-free chocolate kisses and candies (for vegan version)
- 1 teaspoon cinnamon or pumpkin spice (for flavor twists)
- Finely chopped nuts (optional)
Instructions
- Prepare the Dough: Cream together 1 cup softened unsalted butter and ¾ cup granulated sugar until the mixture is light and fluffy. Add 1 teaspoon vanilla extract, then gradually mix in 2 ½ cups all-purpose flour until a soft dough forms. Chill the dough for about 30 minutes to make it easier to handle and roll out.
- Cut Out the Cookie Bases: Roll out the chilled dough on a lightly floured surface to about 1/4 inch thickness. Using a round cookie cutter approximately 2 inches in diameter, cut out cookie circles that will represent the base of the witch hat. Place them evenly spaced on a baking sheet lined with parchment paper.
- Bake the Cookies: Bake the cookies in a preheated oven at 350°F (175°C) for about 10-12 minutes until they are just beginning to turn golden at the edges. Let the cookies cool completely to firm up before decorating.
- Assemble the Witch Hats: Once cookies are cool, unwrap the chocolate kisses and gently press one onto the center of each cookie base. Use a dab of melted candy melts or frosting to secure the candy melts as the hatband around the base of the chocolate kiss. Allow everything to set before handling.
- Add Final Decorations: Get creative with additional sprinkles or edible glitter if you like! Once the candy melts have hardened, your Witch Hat Halloween Cookies are ready to serve or pack up for gifting.
Notes
- Chill the dough well to make cutting shapes easier and prevent spreading during baking.
- Use parchment paper on the baking sheet to prevent sticking and ease cleanup.
- Work quickly with candy melts as they harden fast; have decorations ready before melting.
- Cool cookies completely before decorating to avoid melting or shifting designs.
- Store cookies in an airtight container to maintain crisp texture, separating layers with parchment paper.
Nutrition
- Serving Size: 1 cookie
- Calories: 150 kcal
- Sugar: 12 g
- Sodium: 50 mg
- Fat: 8 g
- Saturated Fat: 5 g
- Unsaturated Fat: 2.5 g
- Trans Fat: 0 g
- Carbohydrates: 18 g
- Fiber: 1 g
- Protein: 2 g
- Cholesterol: 20 mg
Keywords: Halloween cookies, witch hat cookies, festive treats, Halloween party snacks, easy cookie recipe, buttery cookies, chocolate cookies